At some point, many php developers turn to the pcntl functions in php to write a daemon, or server, or simulate threading.
But how do you unit test this with complete code coverage? Here’s the sample code we’ll be testing:
// @codeCoverageIgnoreStart
if (!defined('TEST_MODE')) {
	define('TEST_MODE', false);
}
// @codeCoverageIgnoreEnd
function start_process() {
	$pid = pcntl_fork();
	if (-1 == $pid) {
		die('Error forking');
	} elseif ($pid > 0)  {
		do {
			echo "Parent - " . getmypid() . "\n";
			sleep(1);
		} while (!TEST_MODE);
	} else {
		echo "Child - " . getmypid() . "\n";
		die();
	}
}
We’ll need to overcome a few big challenges in testing this code:
- PHPUnit will not re-assemble code-coverage results from across different processes. This test must remain in one process. (I’ve tried to find a reference for this, but I can’t … PHPUnit is moving towards parallelized tests, but isn’t there yet)
- Any calls to
die() or exit() will end the test prematurely.
- The call to
sleep(1) will take 1 second of wall time in the test. That can add up quickly if you have lots of test cases.
- There isn’t a reliable way to make
fork() return -1 to test the error handling branch of the code.
We need to engage some black arts php extensions to make this happen. An installation guide follows, and the post ends with a complete listing of the unit test.
Disclaimer
These extensions are meant for testing. These are for your dev or test servers. Please do not install these on your production servers unless you’re really positive that you want to have them available in your production environment!
Test Helpers
First we’ll need the test_helpers.so extension. This will let you substitute a callback for any calls to die or exit.
This is a zend_extension, it must be loaded in the correct order, so this one may take some trial and error to get working properly with other zend extensions like xdebug and ioncube. You can find the extension on github: https://github.com/sebastianbergmann/php-test-helpers
Once you’ve downloaded and unzipped the package and are in the folder, you can install with:
$ pecl install package.xml
Then add this to your php.ini file:
zend_extension=/path/to/your/php/modules/test_helpers.so
And when you type php -m at the command line, you should see “test_helpers” listed as a Zend Module and a PHP Module.
Runkit
Runkit is a really fun extension that lets you rewrite functions at runtime, execute code in a sandbox, run lint checks on files without spawning a separate process, and other tasks that you probably shouldn’t be doing. I’ve caused many segfaults in php with runkit. It doesn’t come with too many safety guards, so be careful with it (see the disclaimer about not running this in production). You can find the latest version on github here: https://github.com/zenovich/runkit/
Once you’ve downloaded and unzipped the package and are in the folder, you can install with:
$ pecl install package.xml
Then add this to your php.ini file:
extension=runkit.so
And when you type php -m at the command line, you should see “runkit” listed as a PHP Module. One last thing, make sure to change this configuration setting for runkit so you can change internal php functions:
runkit.internal_override = 1
The Unit Test
I will skip the guided tour of the evolution of this unit test and jump straight to the finished product. Here’s a full unit test of the forking code above with 100% coverage.
Note: In the original file, there are ignore coverage wrappers around the code that turns off test mode. Usually this flag is not in a conditional block, it’s set by the application’s framework and is based on the environment + configuration file. To keep things simple, I’ve chosen to demonstrate this method using a constant.
class ForkTest extends PHPUnit_Framework_TestCase {

	/**
	 * Calls to our mock functions
	 * @var array
	 */
	public static $mock_calls = array(
		'sleep'      => 0,
		'pcntl_fork' => 0,
		'_die'       => 0
	);

	/**
	 * Constructor
	 * Check for necessary php extensions
	 */
	public function __construct() {
		if (!extension_loaded('test_helpers')) {
			echo "These unit tests require the test_helpers extension.  For more information, please visit:\n";
			echo "https://github.com/sebastianbergmann/php-test-helpers\n";
			exit(1);
		}
		if (!extension_loaded('runkit')) {
			echo "These unit tests require the runkit extension.  For more information, please visit:\n";
			echo "https://github.com/zenovich/runkit/\n";
			exit(1);
		}
		parent::__construct();
		define('TEST_MODE', true);
	}

	/**
	 * Setup
	 */
    protected function setUp() {

		// Disable exit / die functionality
		set_exit_overload(array(__CLASS__, '_die'));

		// Sleep quicker (seconds -> milliseconds)
		runkit_function_copy('sleep', '__backup_sleep');
		runkit_function_redefine('sleep', '$sec', 'ForkTest::sleep($sec);');

		// Reset mock calls
		foreach ( array_keys(self::$mock_calls) as $key ) {
			self::$mock_calls[$key] = 0;
		}

		// Get the system under test
		require_once('./fork.php');
    }

	/**
	 * Tear down
	 */
	protected function tearDown() {

		// Restore exit/die functionality
		unset_exit_overload();

		// Restore the original sleep() function
		runkit_function_remove('sleep');
		runkit_function_copy('__backup_sleep', 'sleep');
		runkit_function_remove('__backup_sleep');
	}

	/**
	 * Test the parent path of pcntl_fork()
	 */
    public function testParent() {

		// Force pcntl_fork to return 1 (meaning parent)
		runkit_function_copy('pcntl_fork', '__backup_pcntl_fork');
		runkit_function_redefine('pcntl_fork', '', 'return ForkTest::pcntl_fork(1);');

		// Baseline assertions
		$this->assertEquals(self::$mock_calls['sleep'],      0);
		$this->assertEquals(self::$mock_calls['pcntl_fork'], 0);
		$this->assertEquals(self::$mock_calls['_die'],       0);

		// Call forking code
		start_process();

		// Stuff happened
		$this->assertEquals(self::$mock_calls['sleep'],      1);
		$this->assertEquals(self::$mock_calls['pcntl_fork'], 1);
		$this->assertEquals(self::$mock_calls['_die'],       0);

		// Retore original pcntl_fork functionality
		runkit_function_remove('pcntl_fork');
		runkit_function_copy('__backup_pcntl_fork', 'pcntl_fork');
		runkit_function_remove('__backup_pcntl_fork');
    }

	/**
	 * Test the child path of pcntl_fork()
	 */
    public function testChild() {

		// Force pcntl_fork to return 0 (meaning child)
		runkit_function_copy('pcntl_fork', '__backup_pcntl_fork');
		runkit_function_redefine('pcntl_fork', '', 'return ForkTest::pcntl_fork(0);');

		// Baseline assertions
		$this->assertEquals(self::$mock_calls['sleep'],      0);
		$this->assertEquals(self::$mock_calls['pcntl_fork'], 0);
		$this->assertEquals(self::$mock_calls['_die'],       0);

		// Call forking code
		start_process();

		// Stuff happened
		$this->assertEquals(self::$mock_calls['sleep'],      0);
		$this->assertEquals(self::$mock_calls['pcntl_fork'], 1);
		$this->assertEquals(self::$mock_calls['_die'],       1);

		// Retore original pcntl_fork functionality
		runkit_function_remove('pcntl_fork');
		runkit_function_copy('__backup_pcntl_fork', 'pcntl_fork');
		runkit_function_remove('__backup_pcntl_fork');
    }

	/**
	 * Test the error path of pcntl_fork
	 */
    public function testCouldNotFork() {

		// Force pcntl_fork to return -1 (meaning could not fork)
		runkit_function_copy('pcntl_fork', '__backup_pcntl_fork');
		runkit_function_redefine('pcntl_fork', '', 'return ForkTest::pcntl_fork(-1);');

		// Baseline assertions
		$this->assertEquals(self::$mock_calls['sleep'],      0);
		$this->assertEquals(self::$mock_calls['pcntl_fork'], 0);
		$this->assertEquals(self::$mock_calls['_die'],       0);

		// Call forking code
		start_process();

		// Stuff did not happen
		$this->assertEquals(self::$mock_calls['sleep'],      0);
		$this->assertEquals(self::$mock_calls['pcntl_fork'], 1);
		$this->assertEquals(self::$mock_calls['_die'],       1);

		// Retore original pcntl_fork functionality
		runkit_function_remove('pcntl_fork');
		runkit_function_copy('__backup_pcntl_fork', 'pcntl_fork');
		runkit_function_remove('__backup_pcntl_fork');
    }

	/**
	 * Pretend to fork
	 * @param int $return_value
	 * @return int
	 */
	public static function pcntl_fork($return) {
		self::$mock_calls[__FUNCTION__]++;
		return $return;
	}

	/**
	 * Mock sleep function
	 * Sleep a little bit (seconds -> millisecond)
	 * @param int $sec
	 */
	public static function sleep($sec) {
		self::$mock_calls[__FUNCTION__]++;
		usleep($sec * 1000);
	}

	/**
	 * Mock die function
	 * @return bool
	 */
	public static function _die() {
		self::$mock_calls[__FUNCTION__]++;
		return false;
	}
}
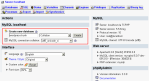
And the proof:
[root@server1 forktest]# phpunit --coverage-html=/var/www/html/coverage/ ForkTest.php
PHPUnit 3.6.4 by Sebastian Bergmann.

.Parent - 25260
.Child - 25260
.

Time: 0 seconds, Memory: 5.75Mb

OK (3 tests, 18 assertions)

Generating code coverage report, this may take a moment.

Code Coverage Report