Customizing P3 Profiler’s Auto Scan | Inside GoDaddy.com
Reply
This weekend, some WordPress core devs ported the unit tests over to a new phpunit compatible runner. I was very excited about this, particularly because the tests I maintain define a constant (DOING_AJAX) which can impact other tests. Using process isolation should remove this impact, although at a performance cost. I used the @runTestsInSeparateProcesses annotation, but the tests failed. PHPUnit was restoring the global state (e.g. before the test split into a separate process) and it looked like this:
1.) Define all of the constants that were already defined
2.) Include the included files
This is the wrong process for the WordPress framework though. The included files were responsible for defining the constants. When they are included, they generate notices for defining constants that are already defined (by PHPUnit).
We all put our heads together and came up with a fix (props nacin) by hijacking PHPUnit_Framework_TestCase::prepareTemplate().
class MyTestCase extends PHPUnit_Framework_TestCase {

	/**
	 * Define constants after requires/includes
	 * @param Text_Template $template
	 * @return void
	 */
	public function prepareTemplate( Text_Template $template ) {
		$template->setVar( array(
			'constants'    => '',
			'zz_constants' => PHPUnit_Util_GlobalState::getConstantsAsString()
		));
		parent::prepareTemplate( $template );
	}
}
Yes, this is hacky, and PHPUnit warns that prepareTemplate() was deprecated in 3.4.0. But when we looked, there were no other solutions, except disabling process isolation.
Okay, so your code is slow. Why? Is it your webservice call? Or a new plugin you installed? Is it your database calls? File I/O? You need a profiler. A profiler gives you the ability to trace the performance of your code through every function call and create an overview of your system’s performance over a certain time period and helps you make intelligent decisions about where to look for problems.
Code profilers like xdebug and xhprof are essential tools to have for diagnosing performance bottlenecks. I highly recommend you check them out. If you have access to installing these extensions on your system, you can probably stop reading here.
But what if you’re in an environment where you can’t install an extension? Luckily, php has a built-in function called register_tick_function that gives you a way to hook in to every user function that’s called. With this, you can write a profiler yourself.
Here’s some sample code to show you what I mean:
declare(ticks=1);
register_tick_function('do_profile');

a();

function do_profile() {
    $bt = debug_backtrace();
    if (count($bt) <= 1) {
         return;
    }
    $frame = $bt[1];
    unset($bt);
    $function = $frame['function'];
    echo __FUNCTION__ . ' :: ' . $function . PHP_EOL;
}

function a() {
    echo __FUNCTION__ . PHP_EOL;
    b();
}

function b() {
    echo __FUNCTION__ . PHP_EOL;
    c();
}

function c() {
    echo __FUNCTION__ . PHP_EOL;
}
And the output:
a
do_profile :: a
b
do_profile :: b
c
do_profile :: c
do_profile :: b
do_profile :: a
You’ll see in the output that the tick function is being called when the function is called, and again when the function is removed from the stack.
This can be incredibly useful if you attach a timer to it.
Note: the
declare(ticks=1);line is mandatory, it tells php to call your tick handler for every function. You can change this todeclare(ticks=10);to call the tick handler every tenth function if that fits your needs.
Here’s a very simple example of a working profiler. It’s practically the same code as above, but with a timer attached and a shutdown handler to show you the profile when the script is done:
declare(ticks=1);
register_tick_function('do_profile');
register_shutdown_function('show_profile');

$profile = array();
$last_time = microtime(true);

a();

function do_profile() {
    global $profile, $last_time;
    $bt = debug_backtrace();
    if (count($bt) <= 1) {
        return ;
    }
    $frame = $bt[1];
    unset($bt);
    $function = $frame['function'];
    if (!isset($profile[$function])) {
        $profile[$function] = array(
            'time'  => 0,
            'calls' => 0
        );
    }
    $profile[$function]['calls']++;
    $profile[$function]['time'] += (microtime(true) - $last_time);
    $last_time = microtime(true);
}

function show_profile() {
    global $profile;
    print_r($profile);
}

function a() {
    usleep(50 * 1000);
    b();
}

function b() {
    usleep(500 * 1000);
    c();
}

function c() {
    usleep(5000 * 1000);
}
And the output hopefully matches what you would expect:
Array
(
    [a] => Array
        (
            [time] => 0.0511748790741
            [calls] => 2
        )

    [b] => Array
        (
            [time] => 0.500598907471
            [calls] => 2
        )

    [c] => Array
        (
            [time] => 5.00052690506
            [calls] => 1
        )

)
The timing matches what we set in each function. The calls, though, is a bit off, since the tick handler can be called twice for each function. Just note that when you’re interpreting the results.
You can really amp this up to get some good info, though. Check this out:

If you want to see how it’s done, or see how well it works, give the P3 Plugin for WordPress a look.
Caveats
The tick function is a user function. This means that whenever php calls a user function it will call your tick function first, but since your tick function is itself a user function, it will also have the tick function called for it. It stops after one level of recursion. Be sure to check for that in your code!
Ticks will not be called on php internal functions. If your app is having problems due to I/O or an extension, you won’t be able to get the same granularity with a tick function as with an extension based profiler.
Bytecode optimizers will cause you problems. Function calls will happen, but they won’t be sent through the tick function. Not exactly sure why on this, but here’s what I’ve got so far:
eaccelerator.optimizer to falseeaccelerator_optimizer(false);zend_optimizerplus.optimization_level to 0There’s a warning that this function is not compatible with multi-threaded web servers and php < 5.3. See the documentation on php.net for more details
Remember to optimize the tick function! It will be called hundreds or thousands of times in your app, so milliseconds will add up! If you have a slight mistake in your timing here, it will cause a big shift in your results.
I saw VisualPHPUnit and was immediately interested. This provided a very nice visual wrapper to PHPUnit without full blown continuous integration, and kept a history of your test passes / fails.

VisualPHPUnit is a wrapper for PHPUnit. It expects that your tests are compatible with PHPUnit’s command line test runner already.
Could this work with WordPress’ Unit Tests? After some investigation, I’m sad to report that, no, it can’t. VisualPHPUnit makes several assumptions that are incompatible with WordPress’ test suite. These are not bad assumptions, just incompatible ones.
PHPUnit_Framework_TestCase).if( !function_exists( 'phpunit_autoload' ) ) {
require_once( 'PHPUnit/Autoload.php' );
}test_includes_formatting.php.Why don’t I submit these issues to VisualPHPUnit? These aren’t bugs. They are incompatibilities between how VisualPHPUnit expects things to be done, and how WordPress’ Unit Test do things. Changing these items in VisualPHPUnit could break compatibility with other projects.
Why don’t WordPress’ unit tests conform to PHPUnit’s structure?
WordPress was also released in 2003, which was before test-driven-development really took off in the php world. Having a testable app requires a certain design.
Also, WordPress wasn’t written from scratch. WordPress started as a fork of B2/cafelog. It wasn’t a greenfield design.
Why doesn’t WordPress just fix their unit tests now?
The core dev team wants a more testable app, and they are working to retrofit unit tests into WordPress, but this is a big challenge.
There are situations in WordPress which are difficult to test, but work perfectly fine. The dev team is left with a difficult choice: Rewrite a functioning piece of code to be more testable, but possibly introduce new bugs, or leave it alone and put off a new test framework a little longer.
You can actually see some discussion about this on ticket 17749.
Here’s a quick walk-through on setting up a WordPress dev environment on Windows using WampServer.
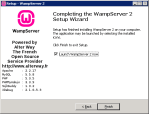
Install WampServer
Visit wampserver.com and download the latest version of WampServer. This package contains Apache2, PHP 5.3, MySQL 5 and phpMyAdmin.
Download the installer for your version of windows. If you don’t know if your system is 32-bit or 64-bit, right-click on “My Computer” and then click “Properties.”
For Vista and later, look for look for “System Type”

For Windows XP, look for “x64” in the “System” description.

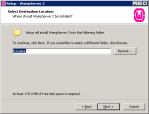
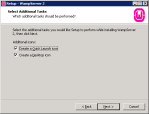
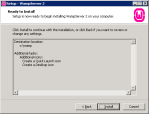
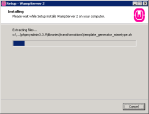
For this walk-through, I will assume you’ll install WampServer to the default folder of c:\wamp. The installation process should look like this:


Configure WampServer
After you’ve installed WampServer, you’ll need to start it and set some configuration options.

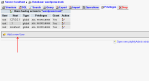
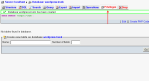
Cannot connect: invalid settings then you’ll need to edit your c:\wamp\apps\phpmyadmin3.3.9\config.inc.php file (your version number may differ) and add this line to your $cfg array (around line 114 or so):$cfg['Servers'][$i]['AllowNoPassword'] = TRUE; GRANT and should never need, CREATE VIEW, CREATE ROUTINE, TRIGGER, etc.). Here’s what the process looks like in phpMyAdmin: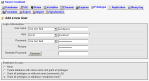
c:\wamp\bin\php\php5.x.y\php.ini). Adjust the following settings:error_reporting = E_ALL ^ E_DEPRECATEDerror_log = "c:/wamp/logs/php_error.log"upload_max_filesize = 50Mpost_max_size = 50Mphp_openssl is enabled. If it’s not, click it. WampServer will enable the module in php.ini and restart apache.
Install a Subversion Client
My personal choice of subversion clients is SmartSVN. My personal taste is to have a separate, self-contained, client and not to use the version control IDE integration and shell integration features that have become popular recently. SmartSVN offers a free version and a paid version. Another very popular option is to use TortoiseSVN. If you’d like to use the command line, you can find windows packages for that, too.
Install WordPress
The most complete resource for this is the codex. For the purposes of this walk-through, you’ll want to check out http://core.svn.wordpress.org/trunk/ to a folder under c:\wamp (e.g. c:\wamp\wordpress-trunk). Then point your browser to http://localhost/wordpress-trunk/ and walk through the installation process. You should see that WordPress created a wp-config.php file for you and this file shows as new in your local subversion project. Unless you have commit access (you don’t) you cannot commit changes back to the repository. Any attempt to do so will result in an error.
Now that you have WordPress installed, visiting http://localhost/wordpress-trunk/ should give you the familiar WordPress home page you’re used to, and http://localhost/wordpress-trunk/wp-admin/ should give you the admin page.
Install Some Plugins
Chances are that your outgoing e-mail will not work. I suggest using the Configure SMTP plugin and using gmail’s SMTP servers.

I also recommend the Debug Bar and Debug-Bar-Extender plugins. To make the best use of these plugins, edit your wp-config.php file and enable WP_DEBUG and SAVEQUERIES. Make sure to see the codex for more wp-config development options.
If you want some sample content, I suggest downloading the Theme Unit Test XML file from the Codex and importing it into your site. You can do this by using navigating to the Tools menu, Import option, then choose WordPress. You may need to install the WordPress importer plugin. After that, just upload the XML file, and make sure to check “Download and import file attachments” option so that the images are saved to your local wp-content/uploads folder.
Note: Jetpack will not work unless your development site is publicly accessible and DNS that resolves correctly. Generally speaking, don’t use Jetpack on your dev site unless you know what you’re doing.
Install an IDE
Everyone has a preference when it comes to integrated development environments (IDE). I like PhpStorm but I use NetBeans because it’s free. Once you set up your IDE, you can start coding. There are plenty of good articles on using xdebug with popular IDEs for advanced debugging. See the NetBeans wiki for information on how to use NetBeans and xdebug.
Profiling WordPress and Plugins
If you are interested in seeing how your WordPress plugins or patches are performing, consider running an xdebug profile. You’ll need to edit php.ini again (click WampServer then php then php.ini), then change xdebug.profiler_enable_trigger to On and restart WampServer. You can now trigger a profile by visiting http://localhost/wordpress-trunk/?XDEBUG_PROFILE=1. This will log all performance information to a file in your c:\wamp\tmp folder. You can view it by visiting http://localhost/webgrind/ or by opening the file in WinCacheGrind.
Note: Using the method above, only URLs containing “?XDEBUG_ENABLED=1” will be profiled. Hits to generated resources (e.g. wp-content/plugins/myplugin/script.js.php) will not be profiled! You will need to use a tool like Xdebug Enabler for Chrome to automatically send the XDEBUG_PROFILE argument for every request.
Contributing
And lastly, make sure read the codex on contributing back to WordPress and consider giving back to the community.
